
BOB'S KNOBS FREQUENTLY ASKED QUESTIONS
- Does each telescope model require a different set of knobs?
- My telescope isn't in your product list. How can I get knobs?
- Is there any danger of dropping my secondary while installing Bob's Knobs?
- Will the factory dust cover hit the knobs when installed?
- My knobs have plastic spacers. Will these cause collimation to drift?
- I removed a factory collimation screw and now the knob threads won't reach. What now?
- How tight should the knobs be?
- How do I perform coarse collimation after installing Bob's Knobs?
- How do I collimate using a star?
- How can I use the shadow of my hand to aid collimation?
- Should I collimate with or without a star diagonal?
- What about using a laser collimator?
-
Does each telescope model require a different set of knobs?Yes, each model of telescope generally requires a different set of knobs because secondary designs vary. As aperture increases, secondary assemblies also become larger, and longer screws are needed for collimation adjustment. Screw diameter and thread pitch can vary as well. We tailor knob diameter to the size of the secondary mirror and to the factory screw thread size to make collimation adjustment as precise as possible. Therefore, always use knobs that are designed specifically for your telescope make and model.
Since telescope manufacturers often re-design their hardware during production, check that the knob threads match the factory screw threads in diameter, length, and thread pitch before attempting to install the knobs.
Back to Top -
My telescope isn't in your product list. How can I get knobs?If your telescope isn't in our product list, we may still be able to provide knobs for it. First, check our custom knobs page for a large variety of knobs and screws that we have in stock. You will also find directions on how to measure the size of screw in your application. If you find what you need there, you can order by clicking on the appropriate Add to Cart button. Otherwise you can contact us directly. First, take a photograph of your factory screw in your scope so we can determine the amount of room available for a knob. We will also need the screw size, or a clear photograph of the screw next to a ruler, so we can match the knob to the correct screw. If a design looks feasible, we will quote you a price. As always, your satisfaction is guaranteed, so if our design doesn't work for you, just return the knobs for a full refund.
Back to Top -
Is there any danger of dropping my secondary while installing Bob's Knobs?Not if you follow our instructions carefully and use the correct knobs for your telescope. By removing only one factory collimation screw, replacing it with a knob, and repeating this process for the other two collimation screws one at a time, there's no danger of dropping the secondary mirror. Our instructions also recommend pointing the optical tube assembly (OTA) slightly downward during the installation of our knobs for an added safety measure.
On most telescopes, the secondary mirror is attached to its backing plate with double-stick tape. It is extremely important to use Bob's Knobs with the correct screw length on your telescope. If the screws are too short, you run the risk of dropping your entire secondary mirror assembly. If the screws are too long, they can push against the back of the secondary mirror and pop it off of the backing plate, with equally unfortunate results. Always check screw diameter, length, and thread pitch before installing knobs. The screw length of our knobs should be within about 1.5 mm (1/16 inch) of the factory screw length. If you have any doubt about whether your Bob's Knobs have the correct screws, please contact us before installation.
Back to Top -
Will the factory dust cover hit the knobs when installed?The factory dust cover will fit normally on most telescopes with Bob's Knobs installed. Also, our knobs will usually clear the Kendrick Kwik-Focus and various full-aperture solar filters.
On a few models, the inside of the factory dust cover sits very close to the secondary housing, and it may contact the knobs. This is an issue with Meade 8 inch (20 cm) SCTs with 3-screw secondary housing in both f/10 and f/6.3 (except the LX90), Meade 10 inch (25 cm) SCT in f/6.3 only, the Vixen VC and VMC series, some Astro-Tech RC scopes, and the very early Celestron 6 inch SCT. For the Meade models we include with your knobs a set of special bumpers that you can apply to the inside of the dust cover so that it sits slightly away from the knobs when installed. Also, the dust cover on affected Meade scopes is thin aluminum, so you can manually press it from the inside center to contour it for additional clearance if needed. For the Vixen VC and VMC series, and some Astro-Tech RC series, there is no simple way to modify the dust cover to fit when knobs are installed, so you can use a shower cap or similar slipcover for dust protection. If you find that your dust cover contacts the knobs on your C6, please contact us and we will send you a free set of dust cover bumpers.
Some variants of the Celestron 8 inch (20 cm) SCT with standard-thread factory collimation screws have a plastic full-aperture "twist-on" dust cover that cannot accept either bumpers or hand-contouring. For additional dust cover clearance, you can install your C8 knobs without the enclosed white spacers. The spacers are needed for the C8 with the Fastar option to raise the knobs slightly so that they will not contact the inside lip of the secondary housing. Spacers should always be used when installing C8 SCT knobs with metric threads. (Note: The small plastic cover over the collimation screws, if present, must be removed and set aside when Bob's Knobs are installed. This cover is cosmetic only and doesn't affect operation of the telescope.)
Back to Top -
My knobs have plastic spacers. Will these cause collimation to drift?Some of our knobs are equipped with white nylon spacers to allow the knob to stand higher for clearance and to adjust screw length. Along with the other materials used in telescopes, nylon changes its dimensions slightly with temperature. However, this will not affect collimation adjustment because all three spacers are affected in the same way.
The most common reason for an SCT to lose collimation is from primary mirror shift during focusing. You can see this effect by defocusing a star with a clockwise turn of the focus knob, collimating, then defocusing using a counterclockwise turn of the focus knob. You will usually see a slight mis-collimation due to primary mirror shift. This effect can be minimized by approaching focus by turning the focus knob in the same direction it was last turned before collimating. That is, if you defocus a star with a clockwise turn of the focus knob for collimation, then make your last turn of the focus knob clockwise when focusing an object for observing. Of course, you can eliminate primary mirror shift altogether by locking the primary mirror and installing an external Crayford-style focuser.
Primary mirror shift can also occur while pivoting an SCT on its mount as it is aimed at a different part of the sky, making a quick collimation touch-up necessary. Finally, collimation almost always changes slightly during transport and from the stresses that occur as the OTA is being secured to its mount.
Back to Top -
I removed a factory collimation screw and now the knob threads won't reach. What now?This can be an issue on certain Meade and Celestron SCT models, especially if our installation instructions aren't followed carefully. Before proceeding, check the knob thread length -- it should be within one or two thread turns of the factory collimation screw thread length. If not, please contact us and check that you have the correct knobs.
Meade Cassegrain-style models with four or six factory secondary screws have a set of springs between the secondary housing and mirror mounting plate to provide the correct tension for collimation precision. When a factory screw is removed, the springs may push the secondary mirror assembly away from the hole in the housing such that the knob thread may not reach.
If your knob has a spacer, remove the spacer. If the threads are now long enough, install the knob and tighten until resistance is felt. Do not force it. Tighten the other two factory screws in the same way. This procedure will compress the springs and move the secondary mounting plate closer to the housing. Remove the knob, install the spacer, and replace the knob. Exchange the remaining two factory collimation screws with knobs, one at a time.
If the knob won't reach even without its spacer, or if it doesn't have a spacer, tighten the remaining two factory screws until resistance is felt. Do not force the screws. This may draw the secondary mirror mounting plate close enough for the knob threads to reach. Install the knob, and exchange the remaining two factory collimation screws with knobs, one at a time.
If the knob thread still won't reach, obtain a longer screw with the same thread type as your factory collimation screw. We can provide such a screw if you contact us, or you can obtain one at your local hardware store. Thread the long screw two turns into the secondary mirror mounting plate and pull it outward while tightening the remaining two collimation screws
until resistance is felt. Do not force the factory screws. Remove the long screw and install a knob. Exchange the remaining two factory collimation screws with knobs, one at a time.
More information on the Meade six-screw secondary can be found here.
Once the knobs are successfully installed, they are probably too tight now. Check the next section, "How tight should the knobs be," for guidance.
Meade and Celestron Cassegrain-style models with three Phillips or button-head Allen secondary screws don't use any springs. Instead, the secondary mirror assembly pivots at its center on a projection protruding from the back of the secondary housing. When the collimation screws are tightened, the plastic secondary housing flexes slightly and provides tension. Removing a factory collimation screw may release tension and allow the secondary mirror assembly to move away from the secondary housing.
If a knob thread won't reach after removing a factory collimation screw, point the OTA slightly downward so nothing can fall onto the primary mirror. Loosen each remaining factory collimation screw a maximum of one turn. Do not remove either screw. Both screws should now be somewhat loose. You should be able to manipulate these screws to move the third hole in the secondary mirror mounting plate closer to the secondary housing so the knob can reach it. Install the knob two turns into the secondary, and repeat the installation of the other two knobs, one at a time.
If the knob thread still won't reach, obtain a longer screw with the same thread type as your factory collimation screw. We can provide such a screw if you contact us, or you can obtain one at your local hardware store. Thread the long screw two turns into the secondary mirror mounting plate and pull it outward while loosening the remaining two collimation screws until the long screw moves sufficiently close to the secondary housing that the knob thread will reach. If you accidentally remove a collimation screw, do not loosen any of the others until this screw (or a knob) is (re)installed into the secondary mirror mounting plate. Exchange the remaining factory screws, and the long screw, with knobs, one at a time.
Once the knobs are successfully installed, they are probably too loose now. Check the next section, "How tight should the knobs be," for guidance.
More information on the Celestron secondary can be found here.
Back to Top -
How tight should the knobs be?After adjusting collimation, the knobs should be neither "too tight" nor "too loose." There is often less than one knob turn between these two extremes, especially on smaller telescopes. (However, see our note below for the Meade six-screw secondary.)
A knob is too tight when there's a marked increase in effort to turn it. Also, the extra tension on the secondary mirror mounting plate may cause optical aberrations to appear temporarily. Forcing a knob even tighter may damage either the knob or the secondary mirror assembly. A knob is too loose when the secondary mirror assembly rattles when a knob is wiggled. A telescope will not hold its collimation when the knobs are loose.
After installing Bob's Knobs, you can easily determine the range between "too tight" and "too loose" by experimenting with them prior to performing the coarse collimation. If you grasp a knob with the same force you would use to pick up a grape, you won't be able to tighten the knob too much -- it will slip in your fingers first. Once all three knobs have the correct tension, collimation is achieved by tightening and loosening different knobs while keeping all three within the correct tension range.
The Meade six-screw secondary behaves differently from the above examples due to the coil springs surrounding each collimation screw. If our installation instructions are carefully followed, the secondary springs will be fully compressed and the knobs will be too tight after installation. Each knob should be loosened one or two full turns before performing rough collimation. This will put the adjustment near its mid-range position. The secondary mirror assembly will not rattle if a knob is too loose; instead, the knob will come completely out of the secondary. To prevent this, do not loosen any knob more than three turns from its fully tightened position. More information on the Meade six-screw secondary can be found here.
Back to Top -
How do I perform coarse collimation after installing Bob's Knobs?When Bob's Knobs are first installed, the telescope will usually be out of collimation. It's often easier to do a coarse collimation in daylight first, and then finish with a star at night.
Cassegrain-style telescopes: Before you install Bob’s Knobs, swing your optical tube assembly (OTA) on its mount so you can look directly into the front from 5 to 10 mirror diameters away. You’ll notice that the various primary and secondary mirror reflections form a set of concentric circles in a properly collimated scope. This is what you want to see again after installing the knobs. (Hint: Cut a small hole in the center of a piece of white paper or cardboard and look through it to eliminate extraneous mirror reflections.)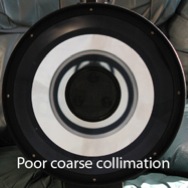
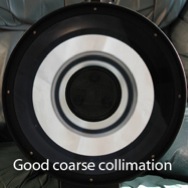
After installing Bob's Knobs, tighten and loosen appropriate knobs until the mirrors and their reflections are once again concentric, and the secondary mirror is held securely. If a knob becomes harder to turn when tightening, loosen the opposite knobs slightly instead. Check your owner’s manual for additional guidance for your particular scope.
The coarse collimation procedure is also given in our instructions, along with some illustrations. Instructions are available as pdf files in English, French, German, Italian, Japanese, and Spanish.Newtonian-style telescopes: These telescopes can usually be collimated accurately using an optical aid or laser collimator. Follow the collimation instructions in your owner's manual.
Back to Top -
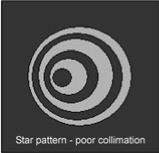
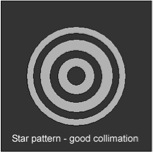
How do I collimate using a star?Star collimation using Bob’s Knobs is very simple. First, let your telescope cool to ambient temperature before attempting collimation. Find a moderately bright star and defocus the image so three or four diffraction rings are prominent as seen through the eyepiece. These rings will be concentric in a collimated scope or skewed if collimation is off. (If your telescope is warmer than the ambient air, air currents will cause the rings to have a pinwheel appearance with rough edges. Wait a while longer before adjusting collimation.)
To achieve collimation, reach around and carefully adjust the knobs while looking through the eyepiece until the diffraction rings are concentric. With experience you can use the shadow of your hand on the star pattern to determine which knobs to adjust (see below). Remember to loosen and tighten different knobs as needed so the secondary mirror assembly remains secure without over-tightening, which is indicated by a marked increase in the effort needed to turn a knob. Use your scope’s slow motion controls to re-center the star in the eyepiece during the collimation process. By using higher magnification you can increase collimation precision. Check your telescope owner’s manual for more information on collimation specifics.
The star collimation procedure is also given in our instructions, along with some illustrations. Instructions are available as pdf files in English, French, German, Italian, Japanese, and Spanish.
Back to Top -
How can I use the shadow of my hand to aid collimation?On most Cassegrain-style telescopes smaller than 12 inches (30 cm) in aperture, you can reach around and adjust Bob's Knobs while looking into the eyepiece for immediate feedback. As your hand moves into the light path, you'll notice a shadow on the star's diffraction ring pattern. Slightly tighten the knob nearest the place where your hand's shadow crosses the narrowest ring spacing. If the knobs are tight enough already, then slightly loosen the knob nearest the place where your hand's shadow crosses the widest ring spacing. Re-center the star in the eyepiece and repeat the process until collimation is correct. With practice, you can have your scope collimated in less than a minute.
Back to Top -
Should I collimate with or without a star diagonal?The general rule is to collimate your telescope with the same configuration that you intend to use. If you plan to do visual observing, collimate with the star diagonal in place. For most camera work, collimate without the star diagonal. Bob's Knobs make collimation so easy that you can re-collimate, if necessary, any time your configuration changes.
Back to Top -
What about using a laser collimator?Laser collimators generally work well on Newtonian-style telescopes with a flat secondary mirror. On Cassegrain-style telescopes, which have a curved secondary mirror, a laser collimator will work properly only if the secondary mirror is perfectly centered above the primary mirror. Unfortunately, telescope manufacturing tolerances are such that slight secondary mirror offset is inevitable. Under these conditions the laser collimator may give a false indication of collimation. Using a star is much more accurate. Note, however, that a laser collimator can be used to speed the process of coarse collimation after Bob's Knobs are first installed.
Back to Top